DanSteph's Texturing tutorial
(Created in 2001, Edited January 2010)
Preliminary notes: Texturing can also be a great frame rate killer if done in the wrong ways. In this tutorial we will se why and how we can avoid this in simple manner.
 Content
 Texturing limitation
Frame rate killer
Box example
A model seen by Directx
Re-using material
Practically: UVW texturing
Final Note
Texturing limitation
The texture are loaded into the 3d card memory for a fastest access. If there is no more card memory they can be also located into system's memory but this is an absolute frame rate killer while there will be constant swaping beetween card's memory and system's memory. Thus at first we should ensure that the texture will fit enterely into card's memory. Basically the first generation of 3d card has set more or less the basic limitation for a total compatibilities:
-Texture size should be multiple of 8 (32,64,128,256,512,1024)
-maximum size is 1024 x 1024 (there is still many CG that don't support higher in 2010)
(Highlight: Read here what the directx DOC for develloper say about texture size)
Frame rate killer
Everyone know that the more pixel (texture) you want to draw, less the frame rate will be but as before I will focus here on the less know issue that can kill the frame rate:
State Change
What is a state change? Every time we change one attribute of polygon: texture, colour, lightning etc etc (those attribute are know as " material "). The state change for technical reason take a lot of time for the renderer so the worse case that can happen in real time display is when you have a lot of state change and thus the best case would be all your polygon sharing the same texture, colour and so on. Of course unless you want to model a black ninja during night, You want more than one texture and colour to draw but here as in modelling we have a "bad" and a "better" way to do.
(Highlight: Read here what the directx FAQ for develloper say about state change)
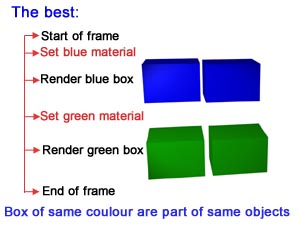
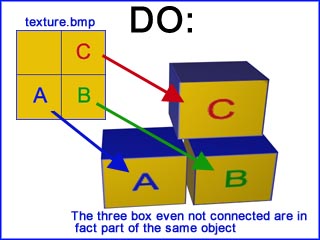
Box example
Consider a small colour example: two box green and two box blue. We immediately see that the best will be at each frame to set the blue colour, draw two box than change for green one and draw the two other box: Two states change.
Unfortunately without some merging of objects there is great chance that at run time the renderer do the things you see below. Multiply this by the number of object you have in your model and you have a nice frame rate killer here.
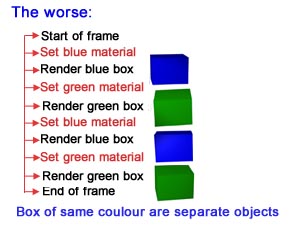
The first thing to retain here is:
Merge as much as possible the objects that have the same material.
Also as an evidence we immediately see one simple optimisation to do: the more material you have in scene the more state change will occurs so instead of having one small texture per object you better group them in one bigger texture that apply on those object. (trying to keep it at a max of 1024x1024 of course)
Try to have bigger texture with more graphics instead of small different texture.

Of course, you may also avoid creating different material that has insignificant change between them.(eg: small color change)
Last, the composition of the material is also relevant while a texture eat much time than a flat color
in increasing order we have:
-Flat color.
-phong color.
-Flat textured.
-phong texture.
Also don't "compress" to much a texture on a face Ie: Avoid puting a 1024x1024 texture on a small polygon.
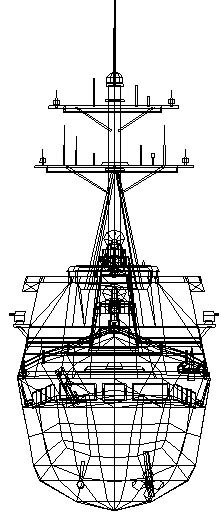
A model seen by directx
DirectX draw the model by "subset" of polygon which have the same material. On the image below captured from a directx app you see one of the arleigh's subset drawed made with only one material. If all those part would not have been merged in one object or worse had different material you can imagine how many more subset would have been drawed resulting in many more state change.

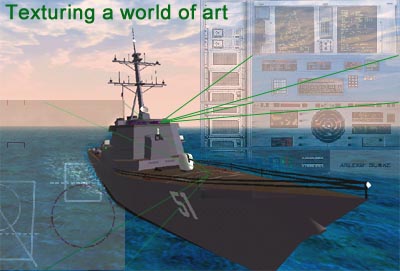
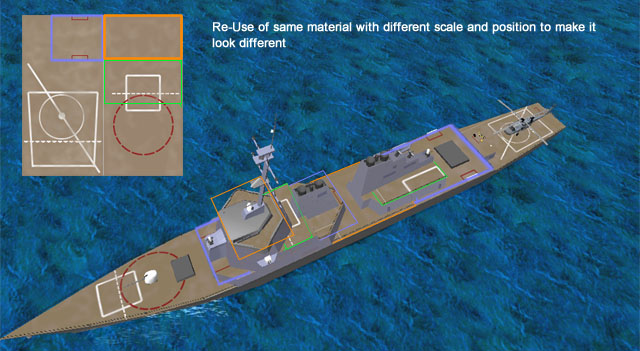
Re-using material
Re using part of a texture with different scale and position is a good technique to save material. You can see on the image below how I have re-used the same 1024x1024 image to add detail on a desk that would have otherwise required several more texture.
A litle note about texture:
Designing a texture can take a lot of time in the modelling process and should not be bypassed. One model very well done can be a real failure if attention isn't paid. Look , color , graininess, the material should make the player feel that it have wood or another thing in front of him. It also help to save poly while an object will often look more real with less poly but a nice texture than another one that wast poly but have a poor texture on it. This process can take hour and hour of work before the result can be any good. So think about this if you use another modeler's work: Give credit where it's due.

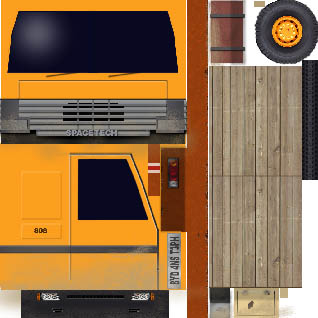
Practically: UVW texturing
UVW texturing know also as "UVW mapping" is a technic that allow you to draw part of one texture on differents polygons. Here below you see one 1024x1024 texture that map on several groups/poly that where all merged before final release of the model:

Don't underestimate the FPS gain !!! You can sometime
double the framerate on average machine using this technic
double the framerate on average machine using this technic
There is hundred tutorial that will teach you "UVW mapping", just type the right keyword in google and make your choice. For example "3dsmax UVW map tutorial" http://www.google.com/search?q=3dsmax+UVW+map+tutorial
Final word
In aviation we say: "if a plane look good it will fly good" unfortunately this isn't true for modelling,(and for aviation either :) ) a model can look good but run very badly. By chance the tips given in those tutorial aren't hard to apply by average modeler and in some way they can even simplify the modeling process.
Once your model optimised with the extra frame gained you will be allowed to add those small detail that make the difference beetween a good and an outstanding model that run also well.
Have fun !
Daniel Polli September 2001 (Edited January 2010)